Dinning room art from an unlikely source

We have two lovely big walls in our dinning room that I've been meaning to create a gallery wall on for, well, the two years that we've live in this house. Yep, that's some of said art tucked in the corner on the floor.


We will eventually put a huge door in the back wall that leads out onto the deck ... if we ever get around to building it that it is. The good part about this plan is that Handsome Handy Hubby doesn't care how many nail/hook holes I put in the back wall.

I've got quite a stockpile of framed photos which I had planned to used to create a gallery wall. My grandmother also recently gifted me with 6 beautiful paintings of various local beaches which I thought would make a lovely arrangement all hung together. But the majority of them were in big heavy frames which is why they are tucked in the corner of the room waiting to be reframed. Or like the one peeking out of the left on top of the sideboard that has had it's frame removed.

And then one day, I found this ...


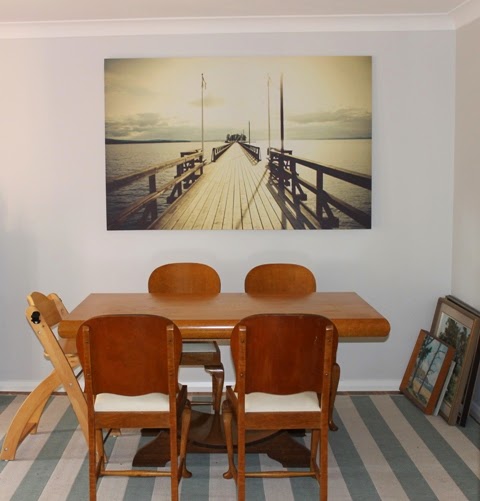
This canvas print is GINORMOUS! The same width as the dining table.  I ummed and I ahhed and I went back to the store where it was languishing about three times to look at it. Then I took Handsome Handy Hubby to check it out and see if he liked it ... and I needed his car as it was too big to fit in mine.
 
He liked it ... we brought it home ... he hung it for me.  I LOVE it!


You know what I love even more?  It cost $50!  Yep, you read that right.  Just fifty bucks. Can you believe I questioned whether I should get this for almost a week before 'splurging'?  Can you guess where it came from? Shall I tell you?  OK ... you know I couldn't possibly keep something like that to myself! The Reject Shop! They had this and two other styles when I got this a couple of weeks ago and I noticed they now have another batch of completely different styles.  It's a very light canvas and not on a supper thick frame. However, the quality of the print is excellent and I can't imagine how much it would cost to have a canvas this size printed from one of your own photos.

So, I'm very happy with my new dining room art. Gram's painting are also at the framers now so I'll have to decide where they are going in a couple of weeks.

Have you got any sources for great art bargains?

A little garden miracle

Not long after we moved in I threw three plants in basic plastic pots onto the area near our front door.  I pretty much ignored them, threw a little water on them once in a while and didn't give them too much thought.

Then, the other day, I noticed this ...


For anyone who knows how hopelessly bad I am at gardening, this is definitely a little miracle.  These little flowers are tiny, delicate and totally beautiful.  Of course, I needed to do them justice with a nice pot.

I know, repotting them while in flower isn't idea.  But, this little miracle was so pot bound that the roots had worked their way out the holes in the bottom of the pot.  I figured they had bloomed on neglect so what the heck, I was game enough to give it a go.

I looked around to see if I had anything I could use as a pot and came up with nothing.  And then I remembered that when we had bought our Ikea kitchen, we purchased some Foto lights.

We bought three of the middle size ones and one of the small ones.  The plan was to use the three over the bench and the smaller one in the drop zone.  We didn't end up using the shades, but we did use the parts.  So, that left us with some great shaped shades to find a use for.

So, I got out my trusty can of spray paint and did this ...


Then, I flipped it over and popped my little miracle right in there with some potting mix.  I really don't know how this plant has survived. When I pulled it out of the pot there was more roots than I thought possible surrounding a few pieces of bark and mulch with a little ball of dirt in the centre.  With a little encouragement, I ended up with this ...


It's a little top heavy, but I love it.  That colour will pop so great once we get rid of our mission brown deck and build the new one ... that's our next big project now that the kitchen is almost complete.

And I got a great photo bomb from my little Miss too...


Lighting Up the Kitchen

I love great lights.  We don't have many of them, but I love them.  It's one of those décor items that I get stuck on, I don't want to commit to an expensive purchase in case I get it wrong, or don't like it once it's in.  Does that happen to you too?

I was like that with the lights for over our kitchen bench.  I wanted something that would make a statement but not be annoying.  I definitely didn't want just down lights (or can lights as they are sometimes called).  I'll tell you the story, but I just want you to know it has a happy ending.


I loved the aqua Colored Seedglass Pendant from Shades of Light, but I just couldn't find anything here in Australia that I liked at the right price.  And since I've had trouble with light shades bought from the USA before, this was one thing I really wanted to buy locally.

So, way back at the beginning of the year when we started our kitchen renovation, we agreed that we would hang 3 of the Ikea Foto pendants over our kitchen bench.  I bought them when we ordered the kitchen but I've been secretly looking for something that I love ever since.  I wanted something to fit with our coastal style, that didn't distract too much in an already busy kitchen and dining area leading out onto a deck, and that would be too low for my tall Hubby to live with as he does a lot of the cooking in our house (love that man!).

Skip forward six months and my wonderful Hubby was finally ready to do the wiring and get the Foto pendants installed.  Yeah, it's taken us that long to get this kitchen reno done, but we have done  it ourselves and sometimes that's just how long it takes. 

Anyway, Hubby was just about to pull the trigger on finally getting the lighting done when, at the 11th hour, I had another idea.  As soon as it crossed my mind I could just about hear him groaning with dread.

You see, I was browsing through one of those eclectic junk stores that sells everything from Aussie souvenirs to kitchen wares when I came across these beautiful huge clear glass jars.  They were super cheap and I loved them, but figured I didn't have a use for them so I left them behind.


The very next day, I kid you not, I was browsing Pinterst and came across this DIY for a glass pendant light made from a jar at Vintage Revivals.  I just knew would work with these fabulous jars to produce exquisite lights at fraction of the cost of something from a big lighting store.  So, I screwed up my courage and told my Hubby about it, showing him the picture of course.  Yes, he groaned a little, maybe even rolled his eyes, and I know he thought I was crazy.  But you know what, he went along with it.

And it all worked out happily for my wonderful new kitchen ...


I adore these lights!  They are unique, the clear bulbs are awesome, the light they shed is warm, inviting and beautiful to work by.  If only my photography skills were up to the task of capturing them really well.

 
They're a little wonky due to the jars not being 100% symmetrical in their making, but I can live with it.  Just adds to the not mass produced feel that I'm loving about them.

 
As for how we made them ... Hubby did it so quick that I didn't even get a chance to take photos!

 
So, instead of giving you a written blow by blow, do what I did and check out the video instructions by Vintage Revivals.
 
The scariest part of all this was drilling the holes.  I had this great idea to place the jars inside a big plastic tub and that way if it shattered the glass wouldn't go everywhere.  That turned out not so stable.  So, what did my oh so brave Hubby do.  Sat cross legged on the deck with the jar between his legs.  I was so nervous!  I mean what if a jar shattered and cut an artery or heaven forbid his man bits!  Of course, none of this happened and in about 10 minutes flat it was all over and done with.
 
What did it cost us?  Well, here's the budget breakdown.
 
Jars - $25 each - yep you read that right!
Pendant fittings - $15.90 each
Light globes - $7.50 each - we used this one from Bunnings
Total for each light = $48.40
 
All in all, that's three beautiful big pendant lights for less than $150.  Beautiful bargain!


Have you DIY'ed any lights?  What kind of results did you have?
 
Participating in my first link party at ...
That DIY Party link party at diyshowoff.com

Teacup Gardening


I've been collecting tea cup trios (cup, saucer and plate) for years.  I've got quite a collection going but not much space to display them.  I'm on a de-cluttering bent at the moment so a couple of weeks ago I went through my collection and decided to let some of them go.  For those I'm keeping, there are a few special and favourites on display in my art deco sideboard.

What to do with the rest?  Well, I've recently discovered miniature gardens as an extension of my fascination with (and plan to create one for my little girl) fairy gardens.  So, what better way to get started than by using my tea cups.  For now, I've planted some lovely little succulents and will see if I can keep those hardiest of hardy plants alive while I work on my fairy and miniature garden ideas.

 
These were super easy to create. 
  • Dump a little potting mix in the cup. 
  • Pop in a succulent. 
  • Spread some bonsai stones over the exposed dirt.
  • Enjoy!
Things I probably should have done but didn't ... use a potting mix meant specifically for succulents and drill a drainage hole in the bottom of the cups.

Using the bonsai stones really made the plants stand out.  You can see the difference below.


I've got a lead on where I can get a load of succulents for free so if this happens, I'll invest in the right potting mix and drill drainage holes when I plant the rest of my little tea cup succulents.  For now, I'm enjoying them sitting on top of my art deco sideboard.


It was a super cheap project as well.  The cups I already had, the potting mix I already had.  The succulents were $5 or $6 each and the bonsai stones for $6 for a bag that will give me enough for about 10 cups.  The outcome is that I get to display more of my collection.

I would like to add some more plants to my home.  What do you suggest that is easy to look after and doesn't need lots of direct sunlight?

Custom Quilt Cover

No matter what you call it ... quilt, comforter, doona ... some kind of warm bed covering is a must in winter.  As you can tell from the title up there, we call ours a quilt.  To quote a phrase from Sherry at Young House Love, I've had a "Dude, Get On That Already" morning and finally finished the quilt cover for our bed.

A year or so ago, Handsome Handy Hubby and I finally bought ourselves a custom size quilt from Aussie Wool Quilts.  We were sick of the nightly tug-o-war with a standard king size that left one of us (usually him) out in the cold.  It was the best decision ever and I can't believe it took us so long.  I can't recall exactly how much it cost us, but it wasn't a ridiculous amount and it was worth every single dollar to be warm and cozy every night.  Even when we have the added little body of our daughter sharing some cuddle time in the morning.

There was just one problem ... a custom size quilt meant a custom size cover.  I can sew, a bit.  So after searching for and failing to find somewhere online that I could order a great one, I decided to make my own.  So off we trotted to Spotlight and picked out a fabric together.  I got home and got started ... and then I stopped.

And this is what our bed has looked like for about a year.

 
 Yes, we both have kid art from Mother's and Father's day on display beside the bed.  It makes our little girl happy and gives me the warm and fuzzies.
 
It was certainly keeping us warm, but it wasn't quite as pretty as it could be.  Oh yeah, you noticed there's no throw pillows did you?  Well, my Hubby is a practical guy and just can't see why you would put little pillows on the bed that you're just going to throw on the floor and then have to pick up every day.  I'm not prepared to argue about that one, so we don't have any.
 
Back to the quilt cover.   Today, I had the house to myself so I finally decided to get on that already and finish the quilt cover that I had actually started last year.  And here it is ...


There's so much light coming into the room that it's difficult to get the colours right but the pattern is a soft greige, light aqua and soft white combo.  I love the way it's come up and it's soooooooo much better than that big plain quilt smacking you in the eye as soon as you even think about looking in that room.

Why did it take me so long to get around to it?  Welllllll, although it's just a big bag, working with this much fabric is hard!  Hauling it around and trying to measure it out is the first challenge.  My only option was to do that on the lounge room floor.  Of course, this meant the lounge room had to be tidy enough that I could lay the whole thing out.  I've been working on keeping my home tidier and today I finally didn't have to spend time putting everything away before I could get started.

Next project for this room ... replace the curtains that I put up two years ago thinking 'they'll do for now until I find the right ones'.  Well, I finally found the right ones, now I just have to save up the money.  My gosh curtains are expensive!  Then the bedside tables ... then creating the walk in wardrobe and ensuite which is a whole other saga.  For now, I'm just happy with my quilt cover.

SHOUT OUT: Teal & Lime

Thanks to a link at Centsational Girl I recently discovered a wonderful, new to me, blog - Teal & Lime.

Teal and Lime

Jackie has such a wonderful decorating style, very readable and friendly style of communicating and has given so much wonderful information for free that I just had to document for posterity just when I came across Teal & Lime and the impact it's had for me.

I started by signing up for and watching her Crash Course and I've spent a few days devouring Teal & Lime's archives in every spare moment, the three things that have helped propel me forward are Jackie's Crash Course video series, and two posts in particular; 7 Steps to Create Your Whole House Color Palette + Worksheet and How to Create Your Decorating Accent Color Palette.

For me, the real defining moment of discovery was the way Jackie has constructed her style statement. She broke it down into three sections - my style is ...; to me that means ...; and my style isn't ... This really helped me clarify what I'm working towards and come up with my own style statement.

My style is crisp, coastal (without being clichéd), softly tailored and incorporates some vintage pieces. 

To me this means fresh, fun, handmade, suitable for a young family and incorporates vintage art deco pieces with quality low end items with a high end feel due to our budget constraints. 

Our home feels welcoming, relaxed, open and fresh.

My style isn't country, rustic, shabby chic, minimal or sleek.

I also used her wonderful colour palette posts to define my palette as follows:

  • Neutral -Dulux Vanilla Quake 1/2 - a lovely true grey which changes from almost white to deeper grey with the light
  • First Bold - Dulux Timeless Grey - a deeper grey
  • Second Bold - Navy - haven't settled on a colour yet as it's more likely to be a lounge colour than a wall colour
  • Accent Colour - Dulux Zenith Heights 1/2 - a lovely light clear aqua - though I'm thinking of tweaking this to Rainwashed if I can find the formula for it here in Australia. The only walls this is currently used on is my laundry and also the back of my built in bookcases.
  • Accent 1 - Aqua - in varying shades from teal to sea glass
  • Accent 2 - Coral - I love how this combines with aqua to create what I think is a coastal vibe but without using the standard red white and blue.


At a time when I was stuck and felt like we had put down the first layer of our home (floors, walls and kitchen) but I was struggling to move forward from there Jackie's wonderful generosity with her information has helped me move forward. For that I cannot possibly thank her enough.

As an added bonus, I've also been led to a couple of other great blogs which I'm making some time to explore and connect with.

My First Reupholstery Attempt

I've had three reupholstery projects on my to do this for ... oh ... about 5 years now.   Yep, I've been procrastinating big time.  Well I've finally finished the first of them.  Ironically, it's the most recently purchased item.

More than a year ago now I bought this sweet little chair with the intention of recovering it to go in Little Miss's room.  It would give me somewhere besides the floor to sit for bedtime stories and middle of the night calls.


Excuse the iPhone pics but they are all I took in it's original state.  I loved that it was little and low enough to the ground for both of us to easily use.  But it was dirty, torn, well past it's prime, and while I love vintage, this was old fashioned.

A bargain at around $20, I can't believe it has taken me more than a year to get around to finishing it.

Bye bye old fashioned and hello gorgeous!


I love how this little project turned out.  The fabric was an eBay purchase and I love it.  The graphic, colour and scale just make me smile every time I see it.

Is it perfect?  Nope.  Do I love it anyway.  Oh yes.  And bonus, Little Miss loves it as well.


I got about half way through attaching the new fabric when it became abundantly clear that my little craft staple gun just wasn't going to cut in.  In fact, it just stopped working at all.  I left that little chair sitting in my dining room unfinished for about two weeks while I agonised about what to do.  Eventually I just had to get it done and that meant parting with $40 for an Ozito Staple Nail Gun.  Best $40 bucks spent EVER!

This little thing rocks.  It packs a big punch in the staple gun arena but is so super simple to load and use.  About a dozen staples later and voila!  Our little chair that had languished in no man's land for a year was suddenly ready for use.  It saves my knees and back at bed time that's for sure and I think it adds a cute little touch to the room.


Next on my hit list for Little Miss's room - the bedside table that's a functional hand me down, but could use a little fancying up.

Pinterest Inspired: Light Shade

I don't even want to think about the hours of my life that have disappeared since I discovered Pinterest.  All of those hours have been very happily spent yes, but have they really achieved anything?  Every now and then.
 
I honestly can't recall where I first can across the idea of using old book pages to create a light shade. But when I searched Pinterest I found this and an idea was born.  My gratitude to Allison Patrick of Zipper 8 Lightning who creates such wonderful items using old book pages and provided the "Pinspiration" for this project.
 
 
So, not too long ago, I decided to get on with it and create this lamp shade.  I love how it turned out.  It was super easy to make ... though it did take some time.  Just a rice paper shade (I used the Ikea Regolit which cost $6.99), an old book (I'd just donated all my unwanted ones so purchased one for $2 at my local thrift store), and some school glue ($2.95 from the local news agent).
 
To cut out all those circles I borrowed a cutter from the wonderful Karen.  A stellar Stampin Up representative (and my wonderful Aunt).  Then I just started gluing them on at the bottom and worked my way up.  I glued only the top edge and overlapped them because that's the way I wanted them to look.  I did line all my text up (mostly) straight so that you can read little snippets on each circle.  I also used some of the chapter titles, page numbers and a blank circle here and there to add interest.


I knew exactly what lamp stand it was going on before I event started.  I've been carting around this floor lamp that was my grandmothers for years. Can't tell you how many homes I've had it in.  It used to have a 50's inspired shade, but that went when I moved more towards art deco furniture and décor.  Since then, this lovely lamp has been languishing in various sheds, garages and junk rooms until now.
 
 
For a few dollars and about 5 hours of gluing while I was watching TV at night I love how it's turned out.  Now I jut have to figure out what to do with the stand itself.  The base and little accent on the end of the curve is woods that's been painted brown at some stage.  The curved arm moves so you can position the light at various heights.  It's metal and I thought it was black, but when I pulled it out and looked closely the black is coming off and it's gold underneath that.  The gold is also scratched showing bare metal so I think that was it's original colour.  I've put this project off for so long because I just can't decide what to do with the base - black, turquoise, copper, dark grey.  I just can't decide. Any suggestions?
 

Inch by Inch

It's been a little quiet on the house front in the last month or so.  We had a little camping break at Easter, we've all be sick ... probably twice ... I've been looking for work.  So, generally, life got in the way and we've had to be careful with money as well.

But slowly, inch by inch we are getting closer to a totally finished kitchen.  Over the weekend Handsome Handy Hubby installed our range hood.

 
We are so happy with how this side of the kitchen has turned out.  Yes, the cook top and range hood are off centre on purpose.  We wanted as large a piece of bench as possible on the right hand side.  The alternative was two small but pretty useless pieces of bench if we centred the cook top.  So, we chose to have it set to the left.  I was hoping to put an open shelf to hold a cook book just on top of the glass splash back, but there's not quite enough room.  So I've got some ideas for artwork that will sit on the right up above the range hood.
 
On the pantry side, we' started our 'art gallery' for out little Miss.  This big bland wall seemed a perfect place for some kid art.  The two framed pieces I've been saving for ages as I love them both.  The pin board is for all the stuff she brings home from day care.  And below that we'll be installing a rail with clips that she can reach to hang her own selections.  Just need to find the right clips.


The top photo on the left is a flower made from a hand print, and the one on the right is Little Miss' favourite pink & purple rainbow.
 
I also deep cleaned the window and sliding door today ... boring but oh so satisfying.  I don't think they've been cleaned for at least 5 years (shudder).  But it's done and while not perfect it's a million time better.
 
Some times it feels like we'll never get this kitchen finished, but inch by inch we are getting there.
 

Happy Birthday To Me

Yes, another birthday is here.  I'm not big on celebrating them these days as each year just seems to fly by.  I'm happy to spend some time with my nearest and dearest and get a massage.  Anything above and beyond that is gravy.

Well, this year I have been royally spoilt!  I ordered what I hoped would be a sensational wall clock a couple of months ago and had to wait a while as it was a new product and not available until now.  As luck would have it, I got the call about a week ago to say that it was in.  I dutifully informed Handome Handy Hubby that I would be happy with this as my gift if he wanted to go and pick it up.

See it up there on the wall?  It's even more sensational than I hoped it would be.  Major bonus is that it's a silent clock.  I've divested myself of several clocks since meeting HHH as he just can't stand the noise when he's trying to sleep at night.


I was also lucky enough to be gifted with vouchers for a massage, manicure & pedicure and a pin up photo shoot.  Not to mention the lovely dinner at a fancy restaurant while my parents looked after our Little Miss, birthday breakfast at Mum & Dad's (including a pancake stack with candles), another stunning roast lamb dinner at home the next night cooked by Handsome Handy Hubby (yes, he cooks too ... score!), a beautiful rendition of Happy Birthday from Little Miss this morning, and last but not least a very gourmet mac & cheese that I've been craving for dinner on my actual birthday ... followed by chocolate cake.  Yes, I'm all about the food these days!
 
I've felt extremely indulged and thoroughly spoilt this birthday.  A totally unexpected and much appreciated surprise.
 
On the topic of kitchen progress we are inching closer.  The backsplash is in and everything except the sliding door is painted.
 

We can even eat in the dining room again!


Our mammoth walk in pantry has been constructed.  Little Miss thinks it's a sensational place to play hide and seek ... as long as she remembers where to push from the inside to get the doors open again.


The inside is even starting to take shape ... kind of.
 

Still a few things to check of our list:
  • Finish around the tops of the cupboards
  • Paint and reinstall the sliding door between the kitchen and the lounge room
  • Get a rug for under the dinning table
  • Bring the rest of the dinning chairs back in from the garage (and re-cover the seats eventually)
  • Bring the breakfast bar stools back in from the garage
  • Move the art deco buffet back into the dinning area
  • Pull everything that is stashed in cupboards, drawers, and other places around the house out and put it back where it belongs in the kitchen, dining room, laundry and spare room ... yes it's a domino situation
  • Hang some art on the walls
  • Install a TV on the wall next to my beloved clock

Did I really say we were almost done?  Well, we are much closer than where we started.
What it looked like at inspection
and what it looked like yesterday

 
SITE DESIGN BY DESIGNER BLOGS